Thursday, April 28, 2011

Creme Fraiche


I am in love with fatty dairy products. Creme fraiche is a great substitute for sour cream and it's much more tangy and delicious when it's made fresh.

Ingredients:
2 cups heavy cream
2 TBS buttermilk

Optional:
1 TBS fresh lemon juice
2 tsp salt

Combine the cream and buttermilk


Give it a quick whisk


Pour into a clean jar and cover


Throw into a dark cabinet or pantry and let it work it's magic for 24 hours


After a night in the cabinet, give the cream a quick stir. Voila! Insanely addictive fresh cream.


Refrigerate for at least 30 minutes before consuming. Should last at least 2 weeks in the cooler.

I like to add salt and lemon to the finished creme, b/c it lifts the flavor and prolongs the shelf life.

I love creme fraiche in scrambled eggs, but you can put it on just about anything. It can also be used as a sauce.

Wednesday, April 27, 2011

Carrot Muffin Fail

Have you even had a muffin so incredible that you obsessed over the perfection of it? Or spent countless hours and dollars trying to perfect something even better? No? Well I have, and I'm almost there.

I made a puree of pecans and dates


I shredded 1 apple and 6 carrots. I grated fresh nutmeg.

I took them out of the oven midway through baking to brush with butter and sprinkle with toasted pecans.


I put energy and love into it, but like a shitty boyfriend, it did not work out. If Julia Child has taught me anything, it's to persevere into the darkness of perfection. Never give up on a recipe you are convinced will be badass. If every homemaker or chef out there did, we would be eating sandwiches and cereal everyday. Three cheers to you carrot muffin, we will figure out our relationship soon.

Homemade Spinach Fetuccine


Once you start making homemade pasta, you will never buy a box again. I would highly suggest investing (a whopping $35) in a pasta maker, but you can make pasta the old fashioned way too.

Ingredients:
1 9oz bag of spinach
3 cups of flour, plus extra 1/2 cup for dusting
3 eggs
3 garlic cloves
1 large shallot
2 TBS olive oil
2 tsp salt
1 Rolling Stones album


Gently saute shallot and garlic in the olive oil on medium low heat until soft. Add spinach and cook until wilted.


Drain spinach for about 15 minutes to get all of those unwanted juices out. Nobody likes wet pasta.


In the meantime take a large bowl and combine the flour and salt. Then take a few minutes to yourself. Make a cocktail, brush your hair, etc.

Once you have extracted the spinach juices, it's time for the good ole food processor. Mix the spinach and eggs together and puree until you no longer have large chunks.


Make a well with the flour and pour in the spinach. With a fork, mix until you have a dough texture.

<

When dough comes together, transfer to lightly floured flat surface (you know like a table) and knead for at least 6 or 7 minutes until firm.


*If your dough is unreasonably wet, add a small amount of flour, unreasonably dry, add a small amount of water.

When your pasta dough is in "unity" and beautiful, form into disk shape, and wrap in a slightly damp kitchen towel. Refrigerate for at least 30 minutes.


After resting, cut your dough into four equal parts.


Take each section and roll to a 1/4" thickness.


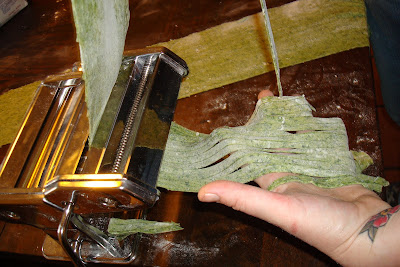
Take it to town with your pasta machine.


Form "nests" and place on a cookie sheet. Freeze for 30 minutes, then transfer to a freezer bag. One portion makes enough pasta for two hungry people.


Tips for using your pasta maker:

Don't force dough, always start at the highest (fattest) setting and work your way down to a thinner consistancy

Keep your dough from sticking by giving flour showers

NEVER wash your machine! Use a pastry brush or clean dry towel to dust off any residue


The old fashioned way??? Roll out dough as flat as humanly possible and cut strips with a knife or pizza cutter. My husband and I did this in our early days, so don't act like it's impossible.

Tuesday, April 19, 2011

Dyeing Easter Eggs Naturally


Jessica Magee is one Adventurous Woman! She was kind enough to invite Jen Snow and myself over to learn how to dye eggs the natural way! I wanted to share this VERY cool lesson with everyone because I was really surprised at how awesome they came out!


Tools For The Job


  • White Eggs (preferably from cage free, humanely treated chickens)


  • Multiple pots


  • White Vinegar


  • Bowls or Jars for Dipping


  • Slotted Spoon


  • Spoon or Tongs for Egg Retrieval


The following are the recipes on how to make certain colors. We took eggs straight from the fridge, covered them in water, dye ingredients, and added 1-2 tablespoons of vinegar depending on volume. Brought to a boil, the let simmer for 20 minutes. We let the eggs cool in the dye so we could pour another drink for ourselves.


Blue: Cut 1/4 head of red cabbage into chunks. Add cabbage to 4 cups of boiling water and stir in 2 tablespoons of vinegar. Let cool to room temperature, then remove. (The cabbage gave the eggs a really neat marbleized look)


Green: Combine a scant teaspoon of turmeric, 1 tablespoon of vinegar, and 2-3 tablespoons of chopped red cabbage with about a cup of hot water. (This was my favorite)


Magenta Red: Mix 4 tablespoons of beets (we used a can) with a cup of cranberry juice. Bring to a boil and add 1 tablespoon of vinegar. This will create a speckled design. (This dye made the darkest color)


Peach-Orange: Combine 1 large handful of onion skin with 1 cup of water. Simmer for 20 minutes and then add 1 teaspoon of vinegar and bring to room temperature. ( This made a very cool color)


** There are many, many different types of dyes to make... so experiment and show us yours!**


Tah Dah!


Pickled Corn Relish

I found this recipe on the Internet and gave it a whirl.... super simple and super tasty!


This will make 3 pints and will store for up to a year if you follow the directions for sterilizing jars and sealing with a hot bath!


1 Small cabbage (I chose purple..because I thought it would be pretty)

1 Large Onion
6 Ears of Corn

2 Jalapenos
1 1/2 Tablespoons of Mustard

2 Tablespoons of Salt

2 Tablespoons of Flour

1 1/2 cups of corn syrup

2 cups of Vinegar


Steam the corn for 30 minutes (Steaming is not the same as boiling...I learned that the hard way)


Chop Cabbage, Onion and Jalapenos into large chunks


Cut the corn directly from the cob and add to the rest of your veggies and throw them in a large pot


Combine Mustard, Salt, Flour, Corn Syrup, and Vinegar to the pot and simmer for 30 minutes.


Pour into Sterilized Jars, and place in a hot bath for 10 minutes.


Let jars sit and cool for 24 hours and then share them with your Adventurous Lady Friends!

Monday, April 11, 2011

Apple Butter and Pickled Green Beans


Our favorite cookbook right now is Jam It, Pickle It, Cure It by Karen Soloman. I have never put a book to more use, and it is worth every penny. You can buy it here. The following recipes are adapted from her book.

Pickled Green Beans:


Makes 3 Pints

Stores In Cool Dark Cupboard For 1 Year

Recipe:

3 Pounds of Green Beans (stems intact)
9 Cloves of Garlic (crushed)
3 Tablespoons Brown Mustard Seeds
3 Tablespoons Yellow Mustard Seeds
6 Tablespoons Dill Seeds
3 Tablespoons Black Peppercorns
6 Teaspoons Kosher Salt
1 ½ to 2 ¼ Cups Distilled White Vinegar


-Combine vinegar, 6 cups of water and salt in a pot and bring to a boil to dissolve the salt
-Divide beans, garlic, and spices into sterilized jars. Leave 1in head space in jars
-Pour boiling vinegar solution into jars leaving ½ in headspace
-Place Jars in a hot water bath for 10 minutes

Apple Butter
Makes 4-6 Cups

Stores for 1 Month In Refrigerator


8 Pounds of Sweet Red Apples (Pink Lady, Fuji, Red Delicious)
2 Tablespoons Lemon Juice
1/3 Cup of Golden Brown Sugar
1 Teaspoon of Kosher Salt
2 Teaspoons Ground Cinnamon
1/2 Teaspoon of Ground Allspice
1/4 Teaspoon of Ground Cardamom

-Pre-heat oven to 350°F
-Peel, quarter, and core apples
-Lightly oil 2 baking sheets
-Cover pans loosely in foil
-Bake apples for 2 hours or until brown and fragrant. Rotate pans 180° after 1 hour in the oven


-Puree apples until smooth (about 4 minutes)


-Add the rest of the ingredients to the apples and puree again until pudding consistency
-Ladle into a sterilized jar and refrigerate

The Joy of Canning


We are officially addicted to canning. Don't be intimidated, there is no need to run out and buy proper equipment to get your feet wet. Here is a quick tutorial on the canning basics and house hold items you can use to set up shop.

What You Will Need:

-Large cooking pot (not aluminum, copper, or cast-iron)
-Mason Jars, Lids, and Seals
-Sturdy metal rack for the bottom of pot
-Ladle
-Funnel
-Regular tongs or jar tongs


Sterilizing Jars and Lids


**Time this process so jars and lids are hot when ready to be filled**

Jars

-Wash jars in hot soapy water
-Stand upright on a rack in a large pot
-Add water to the pot while it’s on the stove, covering the jars by at
least 1 inch.
-Bring to a boil and let jars boil for 10 minutes
-Turn off heat and leave jars in water until they are ready to be filled.

If you are canning mass quantities, you can transfer your sterilized jars to the dishwasher and keep on the plate heating/warming cycle.


Lids

While the jars are boiling, simmer the lids in a saucepan. Do not boil rubber pieces, as it can wear down the seal.

Filling The Jars

-Remove jar from water using jar tongs
-Fill the jar using a funnel and ladle
-Fill just short of the lid. (This is called the “headspace”)
-Dampen a clean kitchen towel and wipe the rim of jar (any
residue can cause the seal to fail)
-Use tongs, place the seal on the rim of jar
-Screw on the metal ring


*Remember that botulism kills, so keep everything as sanitary as possible. Do not touch the inside of jars or lids, and have clean towels on hand

*The “headspace” is important because it allows for the expansion that
naturally occurs when the filled jars are processed in the hot water
bath. If there is no gap the seal may be broken and whatever you were
processing may leak out. Too much headspace can breed bacteria and
ruin all of the contents in the jar.

If what you are processing has a thick consistency, stick a slim plastic
spatula, chopstick, or plastic knife into the jar and raise and lower it a
few times to force out any trapped air bubbles. Bacteria can grow in the
empty spaces where bubbles form.


Processing Jars In Water Bath

-Place jars on the rack in the pot, making sure they are not touching
one another
-Add boiling water as needed to cover the jars by 1 or 2 inches
-Cover the pot and bring to full boil for as long as recipe indicates
-Turn off heat and uncover
-Lift jars with jar tongs and place them upright on a towel or rack 1 inch
apart so air can circulate, and let them cool naturally


*Jars will “ping” as cooling. This insures a seal

*Center of the lid should be slightly depressed.

*Press on the center of the lid with your finger. If it stays down, the seal
is good. If it pops back up, the seal did not take, you will need to store
the preserves or pickles in the refrigerator for no longer than the time
specified on the recipe.

Storing Jars

-Jars that are sealed need to be stored somewhere cool and dark
-Light can alter the color and flavor
-Sealed jars will store up to 1 year
-Before opening a jar of canned food, always inspect it. If the seal
is broken, or its contents have mold or emit a foul odor, discard
immediately!
-An extra precaution against the unlikely but possible growth of any
harmful bacteria while in storage, boil the contents of every jar for 10
minutes before eating

Making Your Own Canning Equipment

Pot rack:
Metal Jar Rings (our #1 choice)
Wood Blocks
Flat Pebbles
Tile
Thick Dish Towels

Tongs:
Take a regular pair of tongs and wrap them with thick rubber bands

More ideas here

Sunday, April 10, 2011

Pickles and Pickled Onions


I love pickles...who doesn't?? After testing several recipes, this is my all time favorite. It's very similar to the old fashioned Claussen that I grew up on.

You will need a 1 quart jar/container

Recipe:
4-5 pickling cucumbers
1/8 cup onion minced (I use a cheese grater. Super fast and easy)
1 1/2 garlic cloves, minced
1 tsp mustard seeds
1 1/2 heads fresh dill
1/2 quart water
1/2 cup cider vinegar
1/8 cup canning salt*

Slice cucumbers lengthwise into quarters (or whatever pickle shape you desire)

Place cucumbers and dill in your 1 quart jar/container/what have you*

Bring liquids and seasonings to a boil, then cool

Pour cooled liquid spice mix over the cucumbers and cover

Place container on the counter away from direct heat for 3 days, turning or shaking once a day

After 3 days, refrigerate

Good for up to two months

*Canning salt is very inexpensive (under $2) and is used for pickling and canning b/c it does not have additives and will dissolve completely in hot water

*Because this is a refrigerator pickle and not shelved, any container in your cabinet will do, as long as it's the right size


This is the most simple pickled onion recipe known to man. And speaking of men...they love it.

You will need a 2 pint jar/container

Recipe:
1 medium red onion
2 cups apple cidar vinegar

Slice the onion and place in tupperware/jar

Pour the vinegar over the onions

Refrigerate

Good for at least 2 months

What that's it???
Yes.
Prepare for a new level of easy awesomeness.

Blueberry Pancakes with Toasted Pecans

There is never a bad time to eat pancakes.


I got this recipe from a fellow scout member and tweaked it. You will not be dissappointed.

Recipe:
1 cup Flour
3 TBS Sugar
1/2 tsp Salt
2 TBS Baking Powder
1 TBS Cinnamon

1 Egg
1 Cup Milk
4 TBS Melted Butter (cooled)
1/2 Cup Blueberries (fresh or frozen)

Garnish:
1/2 cup toasted pecans
maple syrup
1/4 cup blueberries

Mix dry ingredients and wet ingredients separately. Combine. Rock some flapjacks!